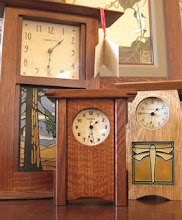
Tag Clouds are the current rage. Bloggers love them because they highlight the tags most written about. The disadvantage, I guess, is that sometimes the reader needs an alphabetical list of subjects. I guess you can have both. Now I have a tag cloud in my widgets to the right of this post. I will give it some time and see if it is a keeper.
The instructions for doing it came from Fido.
Warning - back up your template in case you screw things up.
Saturday, November 20, 2010
Monday, September 20, 2010
How to Remove the Background around Hair
1StopTutorial.com and AliBaba - a good tutorial on removing the background around hair.
Sunday, June 13, 2010
Drop Shadows
In order to make text or numbers stand out, a solid shadow and drop shadow add effect. The tutorial to follow is from Lynda.com and the subject is solid-text. The solid shadow appears above the numbers and symbol in a darker shade of blue. The drop shadow appears below and right in a dark gray scale. Both filters are accessed through the filters button at the bottom right of the Fireworks screen.
As the tutorial is straight forward, I won't add an explanation.
As the tutorial is straight forward, I won't add an explanation.
Wednesday, June 2, 2010
Retouch Menu
The Retouch Menu is found at page 174 of the Nikon D5000 User's Manual.
The steps are simple and I will not go through them in detail. Generally, bring up the image in the view finder by pressing the back button. Then press the OK button to view the retouch menu. Select the desired option and hit OK and save.
 Here are several examples. The first image is the original, the second adds green, the third is sepia, and the last creates a gray scale using the cyanotype filter.
There are many options including D-Lighting which brightens shadows where the contrast between dark and light is significant. Another option is color balance which allows the editor to shift the color predominance.
Of course, Fireworks and Photoshop editing allows the same operations, but isn't it nice to have a choice?
The steps are simple and I will not go through them in detail. Generally, bring up the image in the view finder by pressing the back button. Then press the OK button to view the retouch menu. Select the desired option and hit OK and save.
 Here are several examples. The first image is the original, the second adds green, the third is sepia, and the last creates a gray scale using the cyanotype filter.
There are many options including D-Lighting which brightens shadows where the contrast between dark and light is significant. Another option is color balance which allows the editor to shift the color predominance.
Of course, Fireworks and Photoshop editing allows the same operations, but isn't it nice to have a choice?
Sunday, May 30, 2010
Drop and solid shadows
Shadows are useful if you want to give the appearance of a subject away from the background. It is often used to lift a piece of paper or an image off the surface.
Here I have applied both a drop and solid shadow using the simple filter selector in CS4 Fireworks.The solid shadow to work like this has to have a transparent background. It is also necessary to clear the unneeded pixels at the top and on the right of the image.
I am not sure how I could use this yet, but it is something to remember.
Thursday, April 15, 2010
Old Photographs 2
During the 1920's and 1930's. postcard manufacturers began to colorize photographs.
The colors were predominately reds, greens, and blues. Again, using filters, adjust color, hue and saturation, create this effect. Not a lot is needed. So, heighten the blues and reds with the hue.
Have fun and experiment.
The colors were predominately reds, greens, and blues. Again, using filters, adjust color, hue and saturation, create this effect. Not a lot is needed. So, heighten the blues and reds with the hue.
Have fun and experiment.
Old photographs
In the early days of film, black and white was all that you could get. Images were fuzzy and blurry. to recreate that look, go to filters, adjust color, hue and saturation. Then, desaturate to remove color from the image.If you like, you can leave a touch of color to give the effect of a sightly colorized version. Now, add a little gaussian blur.
This is as far as you can go in Fireworks, but with Photoshop, you can add filter, texture, grain.
Here is the Fireworks version. In Fireworks you can also adjust the brightness and contrast.
For more on this, go to BioRust. The tutorial was written by globator, a Russian with his own photoshop website.
Tuesday, April 13, 2010
Pulitzer winning photographs
Denver Post photographer Craig F. Walker has been awarded the Pulitzer Prize for photography. The image - Nov. 26, 2008. 6:23 a.m. Ian Fisher cradles his Squad Automatic Weapon during a briefing on the troops' morning escort mission.The feature is on Ian Fisher's decision to join the military and go to Iraq.
The Denver Post.
View Craig Walker's story of the Ian Fisher: American Soldier. Photojournalism is at its best.
Monday, April 12, 2010
Edward S. Curtis at the Wichita Art Museum
The Wichita Art Museum is currently showing an exhibition of 40 photogravures of Edward S. Curtis’s The North American Indian collection.
In over 2000 photogravure plates and narrative, Curtis portrayed the customs and lifestyles of 80 Indian tribes.
Northwestern University Library, Edward S. Curtis's 'The North American Indian': the Photographic Images, 2001.
http://memory.loc.gov/ammem/award98/ienhtml/curthome.html
In over 2000 photogravure plates and narrative, Curtis portrayed the customs and lifestyles of 80 Indian tribes.
Northwestern University Library, Edward S. Curtis's 'The North American Indian': the Photographic Images, 2001.
http://memory.loc.gov/ammem/award98/ienhtml/curthome.html
Sunday, April 11, 2010
Panorama
This is a composite image of three shots taken at the bike trail off of Pawnee Road in Wichita, Kansas. The overall image size is 3000px by 600px. Some color adjustments were made to blend the skies.
I hoped to use the smudge tool and further blend the seams where the images conjoin, but the tool did not work. I will have to give this some thought.
I hoped to use the smudge tool and further blend the seams where the images conjoin, but the tool did not work. I will have to give this some thought.
Saturday, April 3, 2010
the robin

A robin is building its nest outside my window. The nest is in a Juniper tree, perhaps six feet off the ground.
Robins are found throughout the US. They will remain year round in the US, but in Canada, they migrate south to warmer area.
The male goes in advance of the female and builds the nest, but he doesn't sleep in the nest at night so as to not attract predators.
Habitat and food.
Saturday, March 27, 2010
Ansel Adams: The Mural Project 1941-1942

The lost photographs of Ansel Adams.
In early 1941, Ansel Adams was commissioned by Harold Ickes, secretary of the Department of Interior, and asked to produce images and large-format murals of landscapes managed by the department.The project was cut short by the start of World War II, and Adams' 200-plus photographs were stored and forgotten.
The Department of Interior website, more about the exhibit.
![[Slideshow: Picture Show]](http://media.npr.org/assets/news/2010/03/26/adams_wide.jpg?s=3)
View the Grand Canyon in full screen. For best viewing go to NPR.
Friday, March 26, 2010
Levels


I almost feel as if I am beating this subject to death. This original image was taken at Pawnee Prairie Park on the west side of Wichita. The time is late evening on a spring day, the sun has just set below the horizon.
The second image uses Fireworks filters, adjust colors, automatic adjust color. The third image adjusts the levels to heighten the blues and reds.
Wednesday, March 24, 2010
Blue lake
The sum of the parts

When you think about it, an image is really just the sum of the parts, the parts being the bits that combine to give us an image. So, when working with a poor image that has high and low tones, you can crop small portions of the image and adjust the color independently of the rest of the image.
The above image was taken at night with automatic settings. The result is an obviously inferior image. Below the image color is adjusted using levels and contrast. But to achieve a better result with the marquee and billboard it is necessary to crop these areas and work on them separately.

Monday, March 22, 2010
Both ways

A cold Sunday morning in Kansas - Toby, my daughter's hyperactive pet, went home to Lawrence. So I was left with just Sammy and Lizzie, and we decided to go for a walk in the country.
Blue skies are not always a given. With either Photoshop or Fireworks, you can add a blue sky with the magic wand and the paint bucket. First, highlight the sky with the magic wand setting the tolerance to 30 or whatever works. Then select the paint bucket, use a gradient, and with the press of a button, you have a nice blue sky. I also added a sharpen as a filter to let the dogs stand out.
Compare the original image.

Sunday, March 21, 2010
An Irish Prayer
We are all looking for a little wisdom in a chaotic world.
Irish Blessing set to images and sound
Irish Blessing set to images and sound
Saturday, March 20, 2010
Composing shots
The center of the picture frame is dead space.
 Thirds : Imagine the camera monitor crisscrossed by lines that divide it into thirds vertical and horizontally. These lines represent the best location of the significant elements in the picture.

Diagonal : Pictures with diagonal compositions make for strong images with lots of energy, but diagonals are harder to find.
The S curve : The S is a sinuous, sensual letter; composing a picture around an S gives the picture interest.
 Thirds : Imagine the camera monitor crisscrossed by lines that divide it into thirds vertical and horizontally. These lines represent the best location of the significant elements in the picture.
Diagonal : Pictures with diagonal compositions make for strong images with lots of energy, but diagonals are harder to find.
The S curve : The S is a sinuous, sensual letter; composing a picture around an S gives the picture interest.

Saturday, March 6, 2010
simple color changes


With fireworks and photoshop you can make a simple change of color to a shirt. With your image selected use the crop tool to isolate the shirt. Save the shirt to your desktop and then apply filters to the shirt. Change the color to something that pleases you, for instance - pink. Now save the shirt with the color change. Open up the original photo, use import and now layer the pink shirt on top of the original image.
The lovely model is Lucia.
Here is the shirt png with the color change applied.

Monday, March 1, 2010
best Olympic shots

Hi-res images from Los Angeles Times photographers Robert Gauthier and Wally Skalij.
I still can't get over the quality of these images by Los Angeles Times photographers Robert Gauthier and Wally Skalij. Everyone should check them out for composition and editing.
Sunday, February 7, 2010
Friday, February 5, 2010
New York - Flatiron Building
Monday, February 1, 2010
Blue Sky
Changing the Sky

There are many different things you can do to make an unexciting sky come alive. With Fioreworks or Photoshop filters, you can sharpen the image, change the hue and saturation, or both.
But, another technique is to layer images. The bottom layer is a background image that consists of the new sky. The top image is your building. Lock the bottom layer and work with the top layer, the building. Use the magic wand and eraser tools to clear the sky revealing the bright sky behind the buildings.
Fast Speed Photography

A fast shutter speed combined with a larger aperature freezes motion and softens the background detail. In the Nikon D5000, shutter speed is controlled by setting the mode dial to S. (This is page 80 of the user manual. Mode S is discussed at page 82.)
After selecting the S mode, check the view finder for information on shutter speed for values between 30s and 1/4000s. Remember a slow speed will blur action and a high speed will freeze action. Now, rotate the command dial (next to the mode dial) and set the desired shutter speed. Use 1/4000s for high speed. Here, for example, is my own shot of a coffee pot under the spigot at a shutter speed of 1/2500s.
Focus and shoot.
This image is from Digital Photography School.
 If you would like to see other images by Ahmed, click here.
Sunday, January 31, 2010
Mirror Reflection

This tutorial is inspired by an Adobe image.
 Adobe likes to use gradients in its backgrounds. The background on the image is a radial gradient with two colors a blue and black.
The mirror reflection effect on the lettering is not difficult. I used the Fireworks: mirrorReflect tutorial as my guide. You can click on the link and follow along or use my steps.
1. Create a new fireworks image with a black background. Then, add a rectangle with a radial gradiant. You can expand the rectangle or shrink it so as to give your gradiant the right look.
2. With the Text Tool type in the words you wish to use. Select the text and then choose Modify from the top menu. Choose symbol and name it if you wish.
3. Now we are going to duplicate the newly created symbol. To duplicate select the symbol and choose cntrl + shift + D. Don't worry if you don't see a change yet, the duplicate layer is laying right on top of the original layer.
4. In the top menu choose Modify, Transform, Flip Vertical. Now that your duplicate symbol is flipped, move it with the selection tool below the original symbol.
5. Now we need to tweak the reflection. Select the duplicate symbol that is the reflection. First, with the skew tool skew the bottom of the symbol out, and then with the scale tool flatten the bottom.
6. Now that the reflection is the right shape, we need to reduce the opacity in the properties panel. Next let's fade the reflection by going to Commands, Creative, and Fade. Select the upper right hand fade.
7. Finally, spice up the lettering with Styles.
Sunday, January 3, 2010
playing with fireworks hue and saturation
This article is a rework of an earlier article by breakdesign.blogspot.com.
Select an image.
Filters ->Adjust color -> Hue / Saturation
Andy Warhol

Original Photo

Pink
Hue -40
Saturation +20

Purple
Hue -110
Saturation +10

hot yellow
hue 0
saturation +100

Select an image.
Filters ->Adjust color -> Hue / Saturation
Andy Warhol

Original Photo

Pink
Hue -40
Saturation +20

Purple
Hue -110
Saturation +10

hot yellow
hue 0
saturation +100

let it snow
Adding snow to a web page is always a fun thing to do when winter comes.
Up until now, to create snowfall on a web page I have used Flash. Today, however, I came across a web page that uses Javascript to accomplish the same feat.
Here is the link to Schillman's site. Schiller has also created a smashing light bulb effect that is way too cool.
The process that Schiller uses is simple: link to a javascript in the head section, then source the javascript in your server. But, suppose you want to create this effect in your blogger file. Blogger doesn't allow javascript to clutter up its server. This means you can't post the javascript in the body section. Instead, use an alternate server that has the js code already loaded.
The answer was given by another blogger, Interestingwebs.blogspot.
His tips include keeping the javascript short, one line usually. the link for the snowfall that he provides is:
(script src="http://snow-effect.googlecode.com/files/snow.js" type="text/javascript")
(/script)
* note. I am changing the open and close tags to a parenthesis so that it shows up in blogger.
Put this code in the of your blog html and watch it snow.
Saturday, January 2, 2010
background images
Well, this is a little frustrating. I tried to put a background pattern into the content area of the blog. It worked and then when I tried to change the image it didn't. The rule to remember is always save your template in a separate file first so that if you screw up as I did, you can always go back.
I will come back to this later to sort it out. I do need to remember the steps.
First, there is information on how to upload an image directly into blogger without using shutterfly. See Blogger Tools.
In summary, the steps are create a new post, upload your image, look in the html, and copy the href. Next edit the layout and add
wrapper
{
background-image:url('http://4.bp.blogspot.com/_wa6zL1GRiOs/SkS13Dw5_WI/AAAAAAAADEo/vXbTj9bL7V0/s1600-h/add+new+picture+window.PNG');
background-repeat:repeat;
}
The only thing left to do is delete "s1600-h" from the http. Save.
lesson one - filters
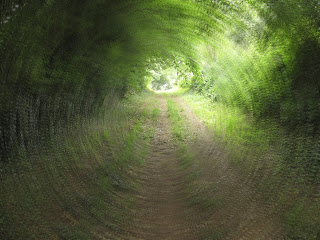
Using the blur filter in photoshop and fireworks is easy.
In the following examples I will apply a radial, zoom, and gaussian blur filter to three different images.
The photograph to the left is a country path in Graffign-Chemin, France. The path is one that my ancient French relatives used to walk when going to the fields to work. I have applied radial blur to give the photograph a time lapse effect. Remember Austin Powers zipping back in time?
The effect works in sports shots also. Use a zoom blur to focus attention. Here is Will waiting for the ball with all the action focused on Will.
Thanks to myJanee.com for the lesson.
1. Duplicate the picture in a new top layer. (How to.)
2. Lock the background image.
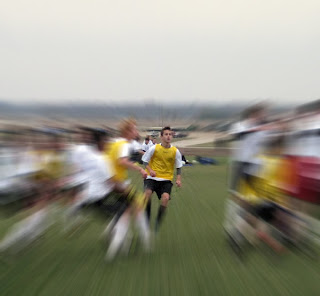
3. On the first layer, select mask.
4. Select the brush tool, and with black chosen paint a reveal in the center of the picture where you want the image to be clear.
5. You are done.
You can also use a Gaussian blur for an overall blur effect.
Movie makers use this effect to isolate a subject. Photographers use the Gaussian blur when focal stops don't do the trick.
Remember that with all of these filters, you are creating two layers. The background or bottom layer remains untouched. The second or top layer has the filter applied to it. The layer is then masked and the brush tool wipes off the area to be revealed.
Subscribe to:
Comments (Atom)


